Showing posts with label Garden Construction. Show all posts

Tuesday, 10 April 2012

Easter in the Garden

We stayed home for Easter - so I was able to get out in the garden for a couple of hours each morning while it was still cool.

I worked pretty hard because after today I won't be able to do any heaving lifting for a few weeks - spinal fusion at C6/7 etc.

Just before the weekend I received a box of plants from the Diggers Club, comprising: 2 x Natal Plum, Acerola Cherry, Stevia (sugar plant) a sugar replacement, Yacon, Comfrey, Dwarf Apple Tropical Beauty and some seeds.  All edible, and the plum, cherry & apple specifically suited to our climate in Brisbane.

Natal Plums
Supposedly the Natal Plums make a nice hedge, so I have planted them against the fence where they will get plenty of sun.  Because the soil is pretty poor in this spot I broke it up with a mattock, then inverted an old pot with the base cut of over the spot and filled this with good quality soil and compost.  The cherries are planted in this.  The idea being that they will get a good start before their roots hit the poorer, harder, clay soil beneath (and the worms will have time to work on this too).

I got all the others planted at all (no heavy digging soon remember).

I also constructed the second raised bed.  After leveling the site (just where the edges would sit, not the whole area) it took 5 minutes at most to put together with the help of SMD.  Thanks to all that preliminary work I did last week.

Then I had to put the protective edge (split irrigation pipe) along the top.  It was so much easier this time with a brand new hooked blade in a proper Stanley Knife!  However, care is recommended.

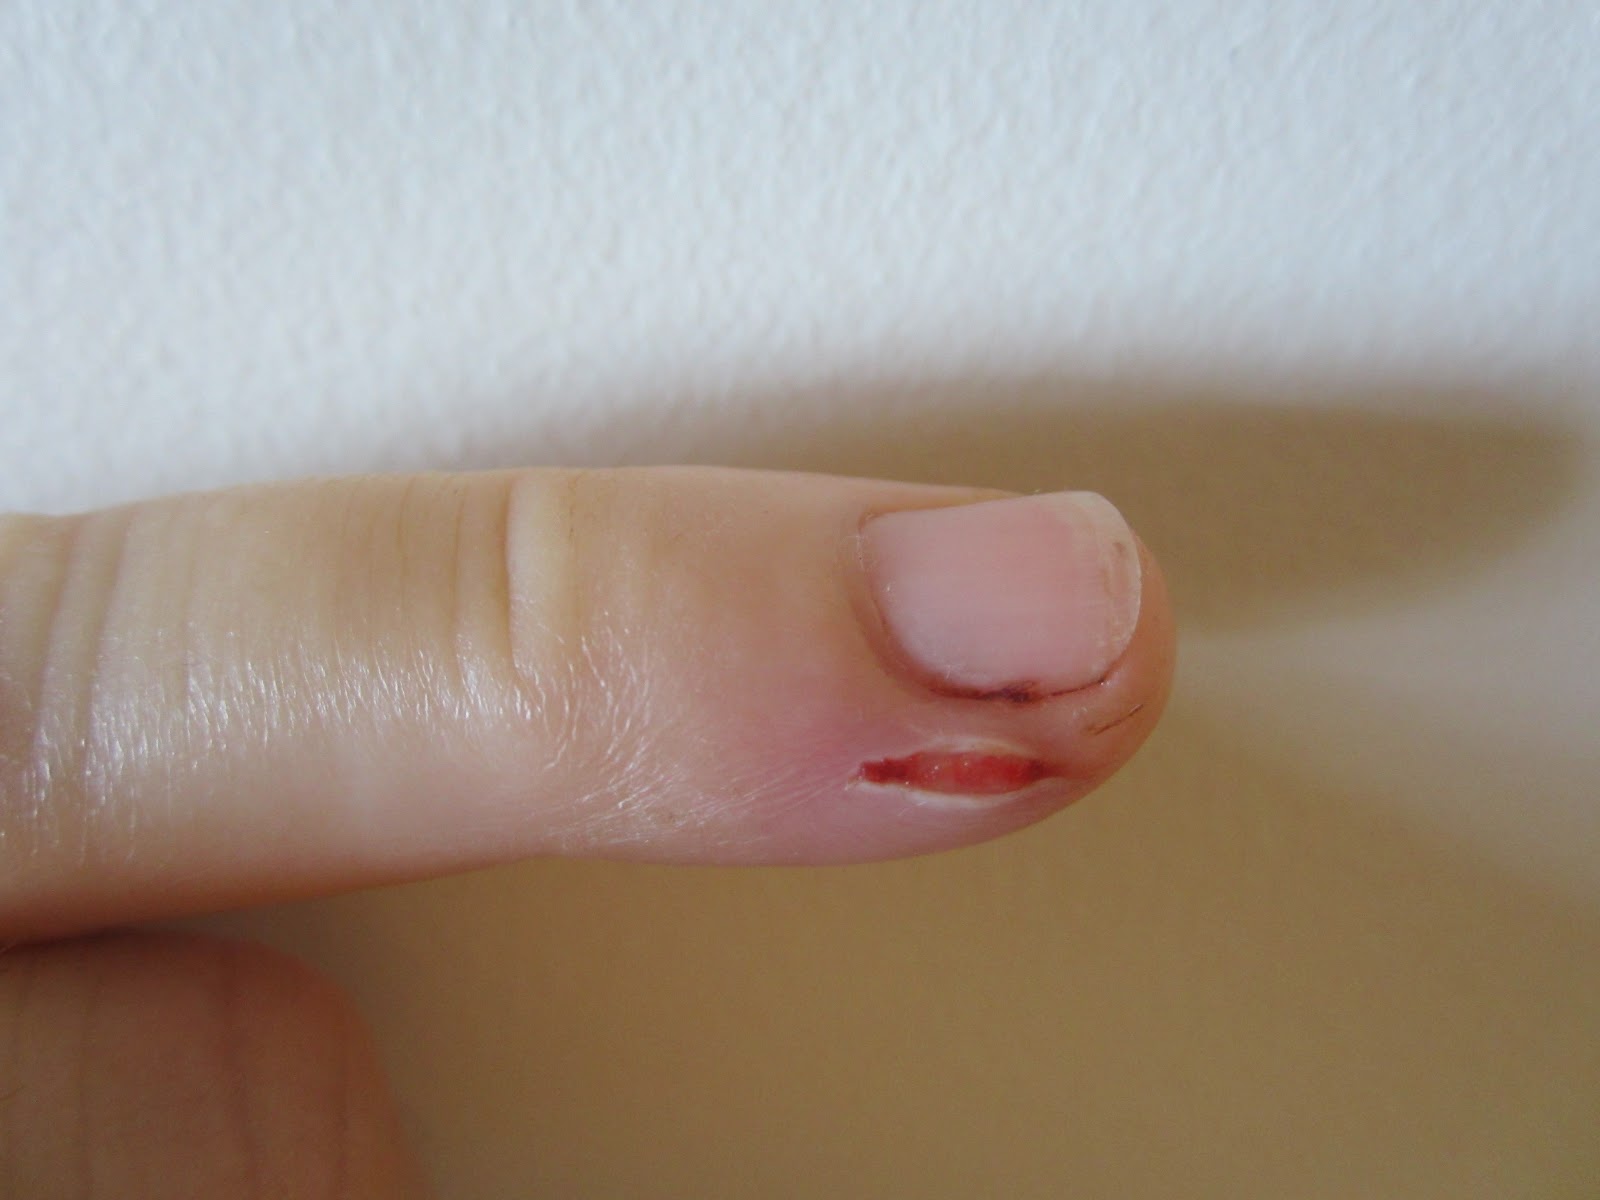
Pinky Finger - left hand
This happened when I slipped with the knife while trimming the pipe to length.  Luckily the blade was brand new, clean & sharp.  I continued the next day, much more carefully!

And the result:


Hope you had a happy Easter!
Ravs

Monday, 2 April 2012

Grinding!

I mastered a new tool on the weekend.
Well, maybe mastered might be a bit of an exaggeration.  But I did overcome my total fear of it - laziness being the driving force.  Using a hacksaw wasn't an option due to access angles and the risk of damaging my knuckles, and a file is slow and puts my teeth on edge.
So what was the tool?

An Angle Grinder!
And why was I using it?

Because I couldn't get screws shorter than 12mm - and they poked out from the 'decorative' wooden corners on my garden bed.  Making them both decorative and dangerous - like cactuses.

What do you think?  SMD says he's happy now, the bed looks more 'finished', though I still have the irrigation pipe top edging to finish.

Bed with 30 x 30 mm corner profile pine.
To fit these corner pieces, which I do admit I like, and make the beds a little safer for kids to run around, I had to unscrew the ends from the bed.  I did this one at a time, rather than disassemble it completely.  Then drill through the sides with clearance holes for the wood screws, hold the corner profile in place, screw, grind the screw ends off, then refit the end piece with the help of SMD to hold it in place.  Then do the same for the other end.

But having solved this design problem for the one bed already constructed - I was able to pre-prepare the pieces for all the other three beds.  Using a production line method to avoid wasting time changing tools continuously.
Drill the holes through multiple sheets of corro at once.  Screw all the corner profiles in place.  Grind the ends off all the screws.  Screw the structural wood supports in place on the end pieces.
And this is what is sitting in my shed as a result.


Sides with decorative corners & ends with structural joiners already in place.
It will now only take a few minutes with an extra pair of hand to put each individual bed together.  But I don't know how long to fit the protective edge on the top yet.

I highly recommend starting with one, almost a prototype, to iron out the bugs, and increase the quality and efficiency of the remaining builds.

A good morning's work.  Thanks to 'Ian Across The Road' (IATR) for the loan of the angle grinder.

And this is some of the soil that is going into the first garden bed.  It is what is left of the straw bale raised no-dig bed that I grew my potatoes in.  Beautiful stuff.  Full of worms, some 6mm or more thick.  Photo doesn't really show how rich & loamy it is though.
A composted down 'no-dig' bed.
I'm still (slowly) working on the second instalment of 'Organic Certification', and reading a couple more books I intend to review.

May your gardens be ever fruitful.
Ravs

Tuesday, 13 March 2012

Today in the Garden (and Raised Bed Construction)

I had a very productive 1 1/2 hours in the garden today - or at least it felt that way as I got a couple of little jobs done that have been nagging me for a while.

First I ran wire from the berry canes to the fence that is to be their support.

Raspberry - this one has 5 runners.

Thornless Blackberry
I then fertilised them with weed tea.  I did the other fruit plants last week.
I make my weed tea by fermenting all the invasive weeds and those with seeds in an old Esky that has lost its insulating ability (not surprising given that it is over 40 years old, genuine vintage!).  This is a great container for this purpose as it seals well and has a drain hole to make it easier to empty.  Look out for one  (even a more modern plastic one) at your local tip shop!

The Esky Fermenter - I grew up with this being our fridge every holidays.

The fermenting contents - newly started.  I am putting my 'suspect' fruit fly infected passionfruit in as well.

A real fermenter - for home brew!  

I use a home-brew barrel to store the fermentation liquid after the solids are inert enough to go into the compost.   I then just decant as much as I need into the watering can using the tap at the base, dilute it (10 parts water to 1 part weed tea) and pour it over the plants.

The next job I did was to set up the second compost bin ready for use again.
To reduce potential pest problems (primarily rats) it is a good idea to dig the base of your compost bin into the ground about 10cm.  This reduces the attractive (to the rats) odours escaping, and makes it harder to dig into.


Hole for the bin

Check that the base of the bin fits all the way into the hole & dig more as necessary.


 Back fill, give it a good soaking & stomp down to get rid of the air pockets and make it a little harder for the raiders to enter.
 I then put a layer of loose carboniferous material in to trap oxygen at the base of the heap.  Now we can leave the other bin to compost down & start filling this one up.

One other job I did last week is already yielding results.
I chopped down a very tall stalk of cassava.


Then I cut the main stalk into approximately 30cm long pieces and shoved them into the ground (and I do mean shoved, no finesse here).  The stump, and the partially buried pieces are all already showing new shoots just a week later.


I also stripped the leaves and deposited them inside the first of my new garden beds.  Yes, I have (partially) constructed one, with the help of the usual suspects Mr & Mrs Skivvy.


It's not finished - partly because that was the day that I came down with the 'flu, and partly because SMD thinks it looks unfinished.  For some reason he had got it into his head that it would be rounded like the commercial ones.  Don't know what made him think that.
But anyway - he didn't like the corners, so I've come up with a way to dress them up (and make them safer in the process).  I'll show you when it gets done.


But this way you can see how simple the construction is.  I just drilled three holes half the width of the supporting wood block in from the end of the corro, and set in the base of the troughs.  Then drove self tapping roofing screws in.  Each end of the long sides first, then attached the short sides.


I also have to finish putting the irrigation pipe on the top edge to make it safe.  I needed a stanley knife and hooked blades for this, which I now have, so there shouldn't be any more excuses.


I hope your gardens are all blooming & fruiting.


Tuesday, 7 February 2012

Building a Raised Bed - Part 1

My vege garden is in a bad state - but this is deliberate.
I found that the location made the garden difficult to work in, without tramping all over the garden itself, so I am letting it go fallow - and starting to build new vege beds.
But don't worry, all the work Mr & Mrs Skivvy & I put in won't go to waste - the chickens are going to move in, and stay in the run when we aren't home.

So now that J5 has started school - I have the time to start building the new beds, with the help of Mr Skivvy of course.

I decided on corrugated iron beds, but when I investigated purchasing the size and number of bed I wanted from a commercial source the cost added up to over $700 dollars. Eeeeeek!

So, after seeing the rustic, recycled corro beds at our friends' house in Stanthorpe, I decided to do it myself, and source the iron from the Treasure Market.  I worked out that this would cost about $35 for the materials.  A bit of a difference eh?

But......then a friend told me how reasonably priced they found the Colourbond bought direct, and cut to length by the supplier.  Getting new steel, to match the shed, would make SMD happier, and there would be less sharp edges & rust for the kids to injure themselves on.  The cost? $177.  I did compromise my recycling ideals, but I have made SMD happy.

After collecting the steel in Mr Skivvy's 'Truck' (read Landcruiser - an old one for towing their off-road caravan), 4 x 2200mm and 4 x 1200mm, we had to cut the sheets in half lengthwise.

The standard width is about 850mm, but I want my beds around 400mm high, so they needed to be cut, and the supplier's machine can't cut lengthwise.

I looked up info on cutting corro & found this page.  We bought the appropriate blade for Mr Skivvy's circular saw just before collecting the material.


SAFETY - You will notice that I am wearing long trousers, long sleeves and a high neck, hearing protection and (harder to see) safety glasses.  Mr Skivvy (who held the sheet still from the other end) was wearing the same.  These precautions are essential.  The swarf (the little bits of metal that fly off when cutting) come off the saw red hot and, although being so small they cool very fast, they do sting as they hit.  I think I would wear a hat and a bandanna over my mouth if I were ever to do it again.
We have wood supporting either side of the cut, and decided cutting in a trough was easier than cutting on a peak, as the saw could rest on the peaks either side.  A proper tradey would have a much better set up.  But this did the job.
One important point - make sure that your power cord is kept completely out of the way.  A significant cause of death & disablement in the garden is people cutting through power cords while using hedge cutters & similar.
More soon (I hope) - as soon as I get onto the next step.

Monday, 4 July 2011

Netted & Patched

The day after I last posted Mr Skivvy did come over, first thing in the morning, to help me put up the net over the vegetable garden.
And a good thing too - on a second look the Brush Turkey had done even more damage than I first thought.  I will have to replant a considerable amount.  Hopefully, given Brisbane's climate, it isn't too late.
When we put the net up we discovered that it wasn't quite big enough to fully enclose the ends of the frame - bad move thinking I could get away with the slightly smaller standard size of net and save money.  I will definitely not be fruit fly proof - but I'm not planting a lot of susceptible veges anyway.  And it will be safe from possums and turkeys and chickens.
Especially as a week later Mr Skivvy donated the remainder of the the net from their mango tree, which they had cut down for their vege garden.
With this I was able to cover the frame over the potatoes - becoming more tempting to chickens & turkeys as they poke their green shoots above the surface, and the open ends of the large vegetable enclosure.  I used baling twine from all those straw bales to 'stitch' the ends together.
And here is the result.
 I haven't had much time to sew - but I did manage a couple of repairs.
J4 had put holes in the knees of three pairs of trousers - so I had to patch them.  But no reason to have boring patches.
I patch both inside & out to make them stronger & longer lasting.  I use iron-on applique webbing on both the inside & outside piece of fabric, then zig-zag around them.
Here are a couple of earlier trousers.
The boys are really happy to wear them.  Might change when they are teenagers though!
Ravs

Sunday, 5 June 2011

Bye Bye Octopi

On Friday a good friend, who also happens to be a talented artist and J4's kindy teacher (and previously L6's) had her last day of work - she's off to enter the land of parenthood herself.
The kindy had a lovely morning tea send-off for her, with pink balloons, all the kids together (of course, the only way all the staff could be there too), and a few parents, like myself, who could make it.
As she is such a special person I had wanted to make something special for her, and as her favourite animal is the Octopus, and her class are also called the Octopuses (all the rooms are named after sea creatures), I decided an Octopus for the baby would be appropriate.


Made with fabrics from my stash.  All the body fabrics have fish on them.


Tuesday, 3 May 2011

Get Back to Work!!

I become a 'working woman' again tomorrow, at least by society's common definition.  I don't think I've stopped working the whole time I've been on LSL.  Do you?
After all - work doesn't necessarily mean 'not fun or interesting'.  That is drudgery, (tedious, hard, or uninteresting work - Macquarie Concise Dictionary).
The word 'work' has 56 listings in the Macquarie Concise Dictionary, but quoting just the first three: "1 exertion directed to produce or accomplish something; labour; toil. 2. that on which exertion or labour is expended; something to be made or done; a task or undertaking. 3 productive or operative activity."
I'd say what I've been up to would satisfy those definitions.

Saturday, 30 April 2011

Treasure Hunt

On the last 'child free' day of my LSL - I didn't actually do a vast amount, but I was happy with what we achieved.
We being Mr & Mrs Skivvy & I (or should that be me, Mum?)
I needed the extra hands to hold the ladder - and provide the ladder itself - so I could trim some branches above the vege gardens & let a little more sun in, plus trim the spent flowers off the bottlebrush in the front garden (so it doesn't get too 'woody' looking).

Thursday, 28 April 2011

Catching Up


I have a lot to catch up with since the computer crash & our holiday - but I'll try to keep it short & sweet.
I can't say what I did on which day - can't remember exactly.

Irrigation
I finished setting up the irrigation system for the vege gardens.
I used two sizes of this tube to clamp the ends of the irrigation pipes.
I slid the tube over the bent ends like so.


I also set up a drip irrigation system for the new pots on the front deck.  These pots will be planted with herbs.
 Chicken Mitigation
Here you can see the back of the 'planks' we installed to stop the chickens throwing the mulch onto the 'soccer pitch' (or lawn).
Trellis
I installed trellis - using tomato wire - on the fence at the back of the vege gardens.
Mrs Skivvy (Mum) helped by holding the roll of wire while I hammered in the supporting nails.
I didn't have wire cutters strong enough to trim off the excess.  Still, it's a safe place to store it for the time being.
Nails were simply hammered in place & bent up to secure the wire.
 The Swarm
 Little more than a week after the bees arrived we noticed some strange behaviour. Lots of bees were gathering outside the entrance to the hive, and those going in didn't seem to be carrying any pollen.
When I noticed them carrying dead bees out of the hive, and a significant number on the ground already I decided to call Col.
Bees gathering around the (closed) hive entrance
 Col informed me that I had a SWARM.  That is another nearby hive (within 700m) had grown too big and had to break up.  The bees had smelt my colony and decided to try and take over their hive instead of finding a new one of their own.  Who ever thought of bees as lazy?
He told me to close off the hive for 24 hours and see what happened.  If the swarm remained after that time then I should hose them, often.
They did, and I did, at least as often as I could. But in the end I decided to let nature take its course, I wasn't home enough to make a difference with the hosing.

I don't know who won - but we are back to a functioning hive again.
Dead bees litter the ground under the hive.

 Tanks
The week before Easter our two front tanks arrived and were installed.  A 5kl tank beside the side fence, and a 4kl one under the front deck, behind the stairs.
The tanks are colourbond steel, in Classic Cream, the same colour as the trim on the house.
The largest tank is manoeuvred into place.

The completed tank system.

The view from the street.
 Fairly unobtrusive don't you think?  We think Eddie (our tank man) did a great job finding the best solution for our space - he really did a heap of work investigating what would fit and how to get them in.  Thanks for the recommendation R&N.  They should be even more unobtrusive when I get some fruit trees planted beside that fence.

We still have two more smaller (2kl each) plastic tanks to go in behind the shed.  The front ones will be mainly for the washing, and the rear ones for the garden.
And with all the rain we have had the last few days the first two are filling quickly!

Dragon Fruit
I've also planted a Dragon Fruit - I think they are ugly plants, but the fruit is nice to eat, and gorgeous to look at, so I thought I would try one.  I've planted in the back corner behind the shed where it can grow over what is left of the mango, and I can't see it except when I want to.
The one I have bought has the red flesh.
 Tasmania
Over the Easter school holiday we went to Tasmania, primarily to visit my Dear Brother (DB) & meet his Lovely Lady (LL).  It was L6 & J4's first visit to the state.
One place I really wanted to visit was the Botanic Gardens - especially to see the Gardening Australia vegetable garden.  Fantastic - so many fruit trees.  And they are building a temporary kitchen garden, prior to a larger permanent one with a real education focus.
I didn't take any photos in the vege garden, but I did photograph some of the herbs, once I think I might want to add to my garden, rather than having to write it all down!


The view from the herb garden
Purple Sage
Golden Marjoram
Lemon Scented Savoury

Salvia & view

I just loved the glimpse of colour through this doorway, and the warm glow of the convict made bricks.

L6 took this photo of the compost bins tucked against the wall.  Just the same as ours!

Beautiful colour!
 Hard at Work!
We helped at a working bee for one of DB's friends.  These are a regular occurrence - approximately once a month or so by the sound of it.  There is a real co-operation and sharing.  A social occasion, as well as helping out your friends.  Also a lot of sharing of equipment & materials.  "I don't need that left over wood under my house, could you use it?", "This couch is uncomfortable for me, would it suit your studio?"
It was a privelege to be invited along.  And I got to see a couple of wonderful gardens.  The soil here is quite poor, very sandy, so raised beds are the order of the day for vegetables.  But the wildlife is prolific (DB &LL live on 100 acres of bush) so the beds have to be fully enclosed to keep out the possums, wallabies etc.  So I now have another use for all that poly pipe - to support a curved roof of netting over my gardens and keep the possums & brush turkeys out of my garden.
Another wonderful idea was using left-over or old guttering hanging on the side of the vege enclosure to grow strawberries and herbs.  I'll try to get some photos to show you.

The highlight of the working bee for the boys was the fires - to burn off the bracken etc we were clearing from the paths, and the toilet.  The main task of the day was to dig a new toilet pit (easier than expected due to the sandy, but still firm, soil - but I wasn't involved, and move a fully enclosed dunny, complete with rainwater barrel & sink for hand washing, from elsewhere on the property.  And here it came!  Sitting atop two large logs and being dragged behind a 4WD ute!  With two of the workers hanging on behind as if riding a sledge!
Once it was nearby we slid two beams underneath and, on the count of three lifted.  Under the expert direction of one lady, we lowered it into the exact position first time!  I really hope I can get hold of some photos for you.

We also helped DB clear an area near his wood BBQ.  The boys enjoyed helping with this as well - the fire again being a big drawcard!
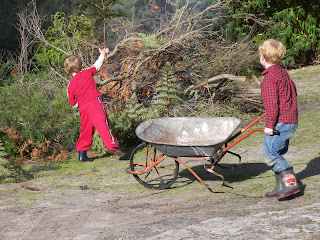
L6 pushing the wheelbarrow full of bracken.

J4 empties the wheelbarrow & throws the contents onto the bonfire.

SMD fully rigged out in safety gear to 'whipper-snip' the bracken near the BBQ
 Port Arthur
We had a lovely day at Port Arthur. And I got another couple of ideas for our garden.
We did explain as much as we thought they could understand about Port Arthur - and the massacre.  We were living in Launceston at that point in time.  Vivid memories of hearing & seeing the reports live on the Sunday night - while at indoor soccer.  But going back now, it still strangely has a wonderful sense of peace about it - as it always did for me.  It is just such a beautiful place.
Love the woven fence around this vege garden at the Commandant's house.  Might try this as a garden edging near the shed - using the Sacred Bamboo.

A beautiful robin the the memorial garden.  And a lovely screen of native grasses.  Where can I put something similar?
 Well - it is my last child-free day before starting back at work next week.  Still some jobs to do, but I have to sort my tax out first (Damn!) or I'll be in trouble with the tax office.

The seeds have arrived from the Digger's Club today as well.

I hope you haven't been completely bored by this long post.  I'll try to keep them a lot shorter now.

Happy Easter
Ravs