Showing posts with label Garden. Show all posts

Saturday, 7 July 2012

After a while....

I thought I would give you an update on a couple of things.

Sourdough: A friend asked if I could bring some of the first batch along when I visited her - but I didn't think it would be great after 5 days (and in the end there wasn't any left), so I made my second batch a couple of days earlier than planned.
The first batch was made primarily with Coles brand wholemeal flour.  The second with Biodynamic Wholemeal Wheat Flour by Red Gum Milling.  This second flour was much finer, without all the obvious pieces of bran.  I also tried to handle the dough less between the first & second proof - to retain more of the air as I felt the first batch was a bit dense for my liking (SMD described it as tasting & feeling like a German Rye Bread - fine if that is what you want).  The other change is that the second proof took place overnight in the fridge, so I could bake the bread fresh in the morning.
This is the result:

I forgot to slice the tops - so they are very plain looking.
They turned out a lighter colour inside, and slightly less dense.

I have planted out the seedlings that I showed you in "Inactive - not quite" into the second vegetable garden.  And labelled them using plastic labels cut from a 2 litre milk bottle.  I found that the icy-pole sticks quickly grew mould and became unreadable, hopefully these will work better.


Seedlings newly planted - still in their toilet roll or egg carton homes.
As you can see I set up the automatic watering system at the same time, it's on the same circuit as the other bed, but has small sprays instead of drip lines.  The net cover is essential - when I had it open to work on the watering system Elsa (the Isa Brown) was in digging up the seedlings straight away!

The potatoes in the chicken feed bags are going well.


I have already added some lucerne hay to the bags, and straight after this picture was taken I rolled the sides up a bit and added plenty of soil, filling up the gaps as much as I could, then gave them a good water.

And lastly - the first vege bed is going OK - with its beetroot, carrots & bok choy.


Tuesday, 12 June 2012

Inactive? Not Quite

I know, long time, but I haven't been completely idle.
I'm 8 or 9 weeks post spinal surgery today,  I wasn't allowed to do any heavy work for 6 weeks, which explains a bit.  But here's what I have done in the last couple of months.

Garlic (far end), carrots, bok choy & two types of beetroot.  And I finally set the automatic watering up again.

Various vegetable seedlings, two local natives (a westringia & a calistemon) free from the council via the Greenheart Fair, and my Mother's Day Aloe Vera plant.

Repotted the strawberries (see them hanging underneath) with some capsicum & oregano - two pots worth.

Potatoes in chook feed bags - a good use of an otherwise wasted space.

I put two seed potatoes in each bag.  Two different varieties,  3 bags of each.  Hope it works.

Sacrificed the last few passionfruit (was too cold for them to ripen anyway) and chopped the vine right back.  Waiting to see if it resprouts, otherwise I'll plant another in the same area.

A member of the melon family - but which one I don't know.  It is self sown,  so we'll just wait & see how it does, growing between the bricks & the retaining wall!

On a separate issue - I suggested at the P&C meeting that we should try to take the Tuck Shop GM Free.  I was expecting some scepticism - but got overwhelming support!  Very happy.  So now I have another job - as, in order to increase my chances of getting agreement, I offered to do all the research & chasing down of info.  But great news don't you think?

And there is a another book review on the way.  Plus I haven't completely forgotten the Organic Certification reviews (it's pretty dry reading though, so sometimes hard to face, hence the delay).

Oh - and I've joined a 'box scheme'.  We are now getting most of our fruit & vege from Food Connect, which sources all the food from within 3 hours drive of Brisbane (they also operate out of Sydney).  Mostly organic, though not always certified, and usually small farms I believe.  This means we are eating in season, and very fresh & cutting down on food miles.  Have been thrilled with the quality so far.  Am also excited about the chance we get at some point to visit some of the people growing our food.

Anyway, life's pretty good, as I hope it is for you.
Best wishes
Ravs

Saturday, 28 April 2012

Fight for the Future


It is easy when reading about climate change and peak oil to get into a panic.  Easy, but not useful.  So whenever I start feeling this way I try to step back and think about what positive steps I can take to mitigate the situation, remembering that I am only one person with an individual set of skills, resources and emotional energy.  Nobody can do everything.

So, here are some ideas, in no particular order.  Some are things to help my individual family, some are about my local community, and some are concerned with the wider national & world community.  Some are things I am already doing, some are ones that I am considering & others are ideas for the future.  I think these are important issues because I believe we are going to see significant effects, if not within my lifetime, certainly within that of my children.

Tuesday, 10 April 2012

Easter in the Garden

We stayed home for Easter - so I was able to get out in the garden for a couple of hours each morning while it was still cool.

I worked pretty hard because after today I won't be able to do any heaving lifting for a few weeks - spinal fusion at C6/7 etc.

Just before the weekend I received a box of plants from the Diggers Club, comprising: 2 x Natal Plum, Acerola Cherry, Stevia (sugar plant) a sugar replacement, Yacon, Comfrey, Dwarf Apple Tropical Beauty and some seeds.  All edible, and the plum, cherry & apple specifically suited to our climate in Brisbane.

Natal Plums
Supposedly the Natal Plums make a nice hedge, so I have planted them against the fence where they will get plenty of sun.  Because the soil is pretty poor in this spot I broke it up with a mattock, then inverted an old pot with the base cut of over the spot and filled this with good quality soil and compost.  The cherries are planted in this.  The idea being that they will get a good start before their roots hit the poorer, harder, clay soil beneath (and the worms will have time to work on this too).

I got all the others planted at all (no heavy digging soon remember).

I also constructed the second raised bed.  After leveling the site (just where the edges would sit, not the whole area) it took 5 minutes at most to put together with the help of SMD.  Thanks to all that preliminary work I did last week.

Then I had to put the protective edge (split irrigation pipe) along the top.  It was so much easier this time with a brand new hooked blade in a proper Stanley Knife!  However, care is recommended.

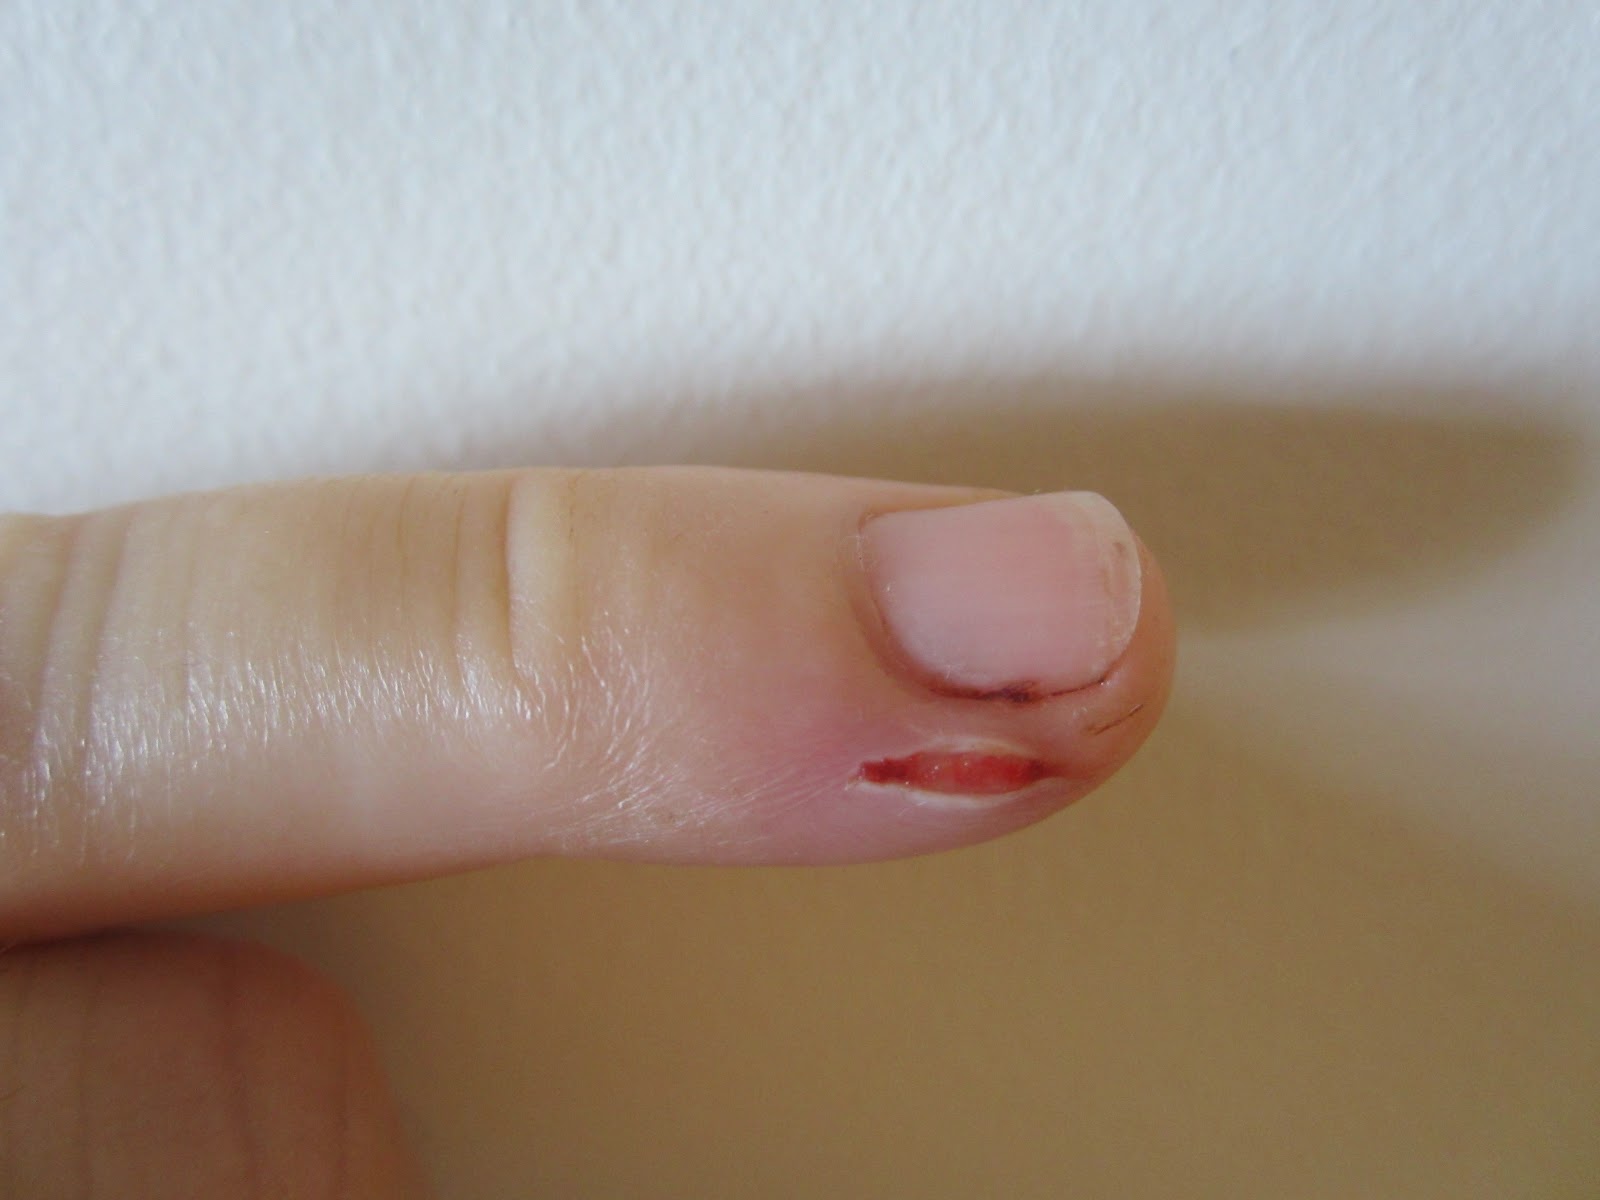
Pinky Finger - left hand
This happened when I slipped with the knife while trimming the pipe to length.  Luckily the blade was brand new, clean & sharp.  I continued the next day, much more carefully!

And the result:


Hope you had a happy Easter!
Ravs

Tuesday, 13 March 2012

Today in the Garden (and Raised Bed Construction)

I had a very productive 1 1/2 hours in the garden today - or at least it felt that way as I got a couple of little jobs done that have been nagging me for a while.

First I ran wire from the berry canes to the fence that is to be their support.

Raspberry - this one has 5 runners.

Thornless Blackberry
I then fertilised them with weed tea.  I did the other fruit plants last week.
I make my weed tea by fermenting all the invasive weeds and those with seeds in an old Esky that has lost its insulating ability (not surprising given that it is over 40 years old, genuine vintage!).  This is a great container for this purpose as it seals well and has a drain hole to make it easier to empty.  Look out for one  (even a more modern plastic one) at your local tip shop!

The Esky Fermenter - I grew up with this being our fridge every holidays.

The fermenting contents - newly started.  I am putting my 'suspect' fruit fly infected passionfruit in as well.

A real fermenter - for home brew!  

I use a home-brew barrel to store the fermentation liquid after the solids are inert enough to go into the compost.   I then just decant as much as I need into the watering can using the tap at the base, dilute it (10 parts water to 1 part weed tea) and pour it over the plants.

The next job I did was to set up the second compost bin ready for use again.
To reduce potential pest problems (primarily rats) it is a good idea to dig the base of your compost bin into the ground about 10cm.  This reduces the attractive (to the rats) odours escaping, and makes it harder to dig into.


Hole for the bin

Check that the base of the bin fits all the way into the hole & dig more as necessary.


 Back fill, give it a good soaking & stomp down to get rid of the air pockets and make it a little harder for the raiders to enter.
 I then put a layer of loose carboniferous material in to trap oxygen at the base of the heap.  Now we can leave the other bin to compost down & start filling this one up.

One other job I did last week is already yielding results.
I chopped down a very tall stalk of cassava.


Then I cut the main stalk into approximately 30cm long pieces and shoved them into the ground (and I do mean shoved, no finesse here).  The stump, and the partially buried pieces are all already showing new shoots just a week later.


I also stripped the leaves and deposited them inside the first of my new garden beds.  Yes, I have (partially) constructed one, with the help of the usual suspects Mr & Mrs Skivvy.


It's not finished - partly because that was the day that I came down with the 'flu, and partly because SMD thinks it looks unfinished.  For some reason he had got it into his head that it would be rounded like the commercial ones.  Don't know what made him think that.
But anyway - he didn't like the corners, so I've come up with a way to dress them up (and make them safer in the process).  I'll show you when it gets done.


But this way you can see how simple the construction is.  I just drilled three holes half the width of the supporting wood block in from the end of the corro, and set in the base of the troughs.  Then drove self tapping roofing screws in.  Each end of the long sides first, then attached the short sides.


I also have to finish putting the irrigation pipe on the top edge to make it safe.  I needed a stanley knife and hooked blades for this, which I now have, so there shouldn't be any more excuses.


I hope your gardens are all blooming & fruiting.


Saturday, 10 March 2012

Shredding

I had a little more time than expected on Thursday afternoon due to not being needed to help at school,  so I decided to start a job that I have been putting off for ages. I tell myself it is out of consideration for the neighbours as it is extremely noisy.
I started shredding the pile of tree trimmings that have been sitting under our nature strip tree for months (and months and .....).

Shredder, chippings and the pile of trimmings under our poinsiana.  The larger leaves you can see are sweet potato, the rest is weeds.
I bought the shredder on ebay for $60 (or was it $80?) anyway, a pretty decent price.  And the blade had just been sharpened too.  The idea is that I chip a fair proportion of our garden trimmings, up to the size it can handle, and therefore save money on purchasing mulch, tip fees and the petrol used to do either of these.  Plus reducing my carbon footprint (the petrol again) and the amount of nutrients lost to landfill (though much of the green waste does actually get composted).
It is going to take a fair amount of time to save on the mulch though - the occupied volume of the trimmings is at least 4 times that of the chips.  But never mind, it's the thought that counts.

I did shred some of the trimmings when they were first cut, and still green.  It took ages to get through - the shredder kept overheating.  Which is part of the reason I put it off so long.

And now I am glad I did.  The branches have lost so much of their strength with having dried out (and in some case started to rot), so it was much quicker and the shredder took longer to overheat & trip out.

I have a bit more to go on this pile.  And then I have to tackle the one inside the fence.


Pretty much over my lurgy now, so should start to get more done in the garden (the soccer pitch desperately needs weeding), including finishing off the first of the new garden beds.  The cooler weather should help too.


Wednesday, 15 February 2012

Pineapple

Remember those pineapples we had growing?
Well one was well and truly ready to pick the other day.

The same day we bought ourselves a juicer, and SMD was going to use this in his first experiment!
We were all thankful that I stopped him, as it was probably the most delicious pineapple we have ever eaten.  A pale buttery yellow it was sweet but smooth, a 'rounder' flavour than the shop bought ones, not as acidic.
I think it was due to two things - being left to fully ripen in the sun, on the plant, and being devoured within a few hours of being picked.
They take a while to grow & produce fruit, but they are well worth planting (and easy, just sit the top of your pineapple on the soil & let it go).  They can be quite decorative too.
Yum!
Ravs.

Tuesday, 22 November 2011

Green (eyed monster?)

I did promise to put up some photos of my friends' vege garden in Stanthorpe.  They live on a mostly bush block with a cleared area around the house, a creek at the bottom of the property & a HUGE granite outcrop on one side.  Plenty of space for veges, chooks & kids.

Wide view of the vege garden.  Fenced for the usual offenders (wallabies, rabbits, pet dog, etc)

The chickens going through the 'tunnel' from their house to the run.

A rotated view of an orchid in the bush area down the back of the block.

Various Irises in the "Fairy Garden" - their bathtub is located in this area - Yes, it really is outdoors.  The kids loved it!


No Fairy Garden would be complete without Foxgloves!


Onions & friends - plus two other beds.

Lettuces and friends.

The mushrooms growing in the purchase spent mushroom compost.  They made a great addition to dinner! Broad beans can be seen behind.

Yet another glorious vegetable bed.  I'm told the carrots never get terribly big - the kids eat them before they get the chance.

Another view of the onions.

A cage made from recycled materials - protecting the delicate seedlings.


It is so long since I wrote that I have much more to fill you in on.  But I'll just have to do it a bit at a time.  Need to take some more photos.
And Christmas is coming - another reason I haven't updated you recently, I've been spending my time shopping online for the last few things, and creating the annual family calendar.
Take care & bye for now, but before I go....
.....a couple more of the chickens.
Ravs

Chickens in their run.

The man and his harem. Lookers aren't they?